Master DaVinci Resolve: Top Editing Tips and Tricks You Need to Know
Introduction: DaVinci Resolve
DaVinci Resolve is a free video editing tool owned by Blackmagic Design, founded by Grant Petty in 2001. It has become one of the strongest video editing platforms available, providing Hollywood-level features for free. Whether you’re just starting out or are a seasoned editor, mastering the use of DaVinci Resolve can bring your content up to a professional level.
We’ll discuss DaVinci Resolve’s best editing tips and tricks to master the software, be more convenient, and make great visual content.
- Why DaVinci Resolve?
- Top Tips and Tricks For DaVinci Resolve
- 1. Use Your Project Efficiently
- 2. Use Keyboard Shortcuts to Advance Workflow
- 3. Master the Cut Page for Fast Edits
- 4. Use the Color Page for Cinematic Grading
- 5. Insert Smooth Transitions with Ease
- 6. Utilize Adjustment Clips for Global Effects
- 7. Add Professional Titles and Lower Thirds
- 8. Sync Audio Automatically
- 9. Use Proxy Mode for Faster Playback
- 10. Export with the Right Settings
- Bonus Tips
- Common Mistakes to Avoid While Using DaVinci Resolve
- Guide to Download DaVinci Resolve
- Minimum System Requirements
- Conclusion
- FAQs
- You may like:
Why DaVinci Resolve?
DaVinci Resolve is recommended because it has everything that you might require: video editing, color grading, audio post-production, motion graphics, and visual effects.
Best features are
- Professional color grading tool.
- It has multi-user collaboration.
- Fusion for high-end VFX.
- It is Fairlight for audio editing.
- It has a high-performance timeline and trimming.
Top Tips and Tricks For DaVinci Resolve
Here we’ll talk about top tips and tricks. Let’s go ahead.
1. Use Your Project Efficiently
Organize your media before editing. Use bins and smart bins to group footage, music, sound effects, and graphics. This keeps your workspace uncluttered and saves time during the edit.
Quick tips are
- Right-click in the Media Pool to create bins.
- Automatically sort files into Smart Bins by using keywords and metadata.
2. Use Keyboard Shortcuts to Advance Workflow
Utilizing keyboard shortcuts is one of the quickest ways to edit faster. Here are some must-knows:
- Cut Clip: Ctrl+Backspace (Windows) / Command+Backspace (Mac)
- Ripple Delete: Shift+Delete
- Add Edit: Ctrl+B / Command+B
- Switch Between Pages: Shift+1 to Shift+7 (Media, Cut, Edit, Fusion, Color, Fairlight, Deliver)
- You can also personalize shortcuts in DaVinci Resolve > Keyboard Customization.
3. Master the Cut Page for Fast Edits
It is important to master the Cut Page. It’s improved for speed and perfect for editors who want to cut together rapidly edited content.
Some key functions:
- It has a SOURCE TAPE VIEW for rapid scanning.
- It is a dual timeline for easy navigation.
- Or quick export options.
4. Use the Color Page for Cinematic Grading
This tool is famous for its advanced color grading capabilities. Here’s where to begin:
Basic Color Grading Workflow:
- Balance your image with lift, gamma, and gain controls.
- Add contrast and saturation for more punch.
- Work with the color wheels to make adjustments to skin tones and highlights.
- Apply LUTs (look-up tables) for stylized looks.
5. Insert Smooth Transitions with Ease
Transitions can create a smooth flow and provide style. DaVinci Resolve has native transitions such as Cross Dissolve, Smooth Cut, and Wipe.
How to insert let’s know here:
- Navigate to the Effects Library > Video Transitions.
- Drag and drop a transition between two clips.
- Adjust duration and behavior in the Inspector.
6. Utilize Adjustment Clips for Global Effects
If you wish to add the same effect to several clips, utilize an adjustment clip.
Steps are here:
- Navigate to Effects Library > Effects > Adjustment Clip.
- Insert it above your clips in the timeline.
- Add effects, color grades, or titles to the adjustment clip.
7. Add Professional Titles and Lower Thirds
It has a set of customizable titles found within the Fusion Titles section.
How to Use:
- Go to Effects Library > Titles > Fusion | Titles.
- Drag a title onto your timeline.
- Adjust text, font, color, and animation in the Inspector.
8. Sync Audio Automatically
Using external audio? DaVinci Resolve will sync it for you.
How to do it:
- Select your video and audio files in the Media Pool.
- Right-click > Auto Sync Audio > Based on Waveform.
9. Use Proxy Mode for Faster Playback
High-resolution footage can slow down playback. Enable proxy mode to work smoothly.
Steps:
- Go to Playback > Timeline Proxy Mode > Half Resolution or Quarter Resolution.
- You can also generate optimized media via Media Pool > Right-click > Generate. Optimized Media.
10. Export with the Right Settings
Once your edit is finished, it’s time to use the Deliver page to export. Select the correct preset for your platform:
- YouTube: H.264 MP4, 1920×1080, 24–60 fps
- Instagram: Square (1080×1080) or Vertical (1080×1920)
- TikTok: Vertical, H.264, AAC audio
Bonus Tips
- Turn on Autosave.
- Don’t lose your project. Go to Preferences > User > Project Save and Load, and turn on autosave every 5–10 minutes.
- Use Versions for Grading
- Make still frames and versions to try alternative color looks without losing your initial grade.
- Learn Fusion for Motion Graphics
- Fusion is DaVinci Resolve’s equivalent of After Effects. Begin with simple nodes such as Merge, Text+, and Transform for animated intros or motion titles.
Common Mistakes to Avoid While Using DaVinci Resolve
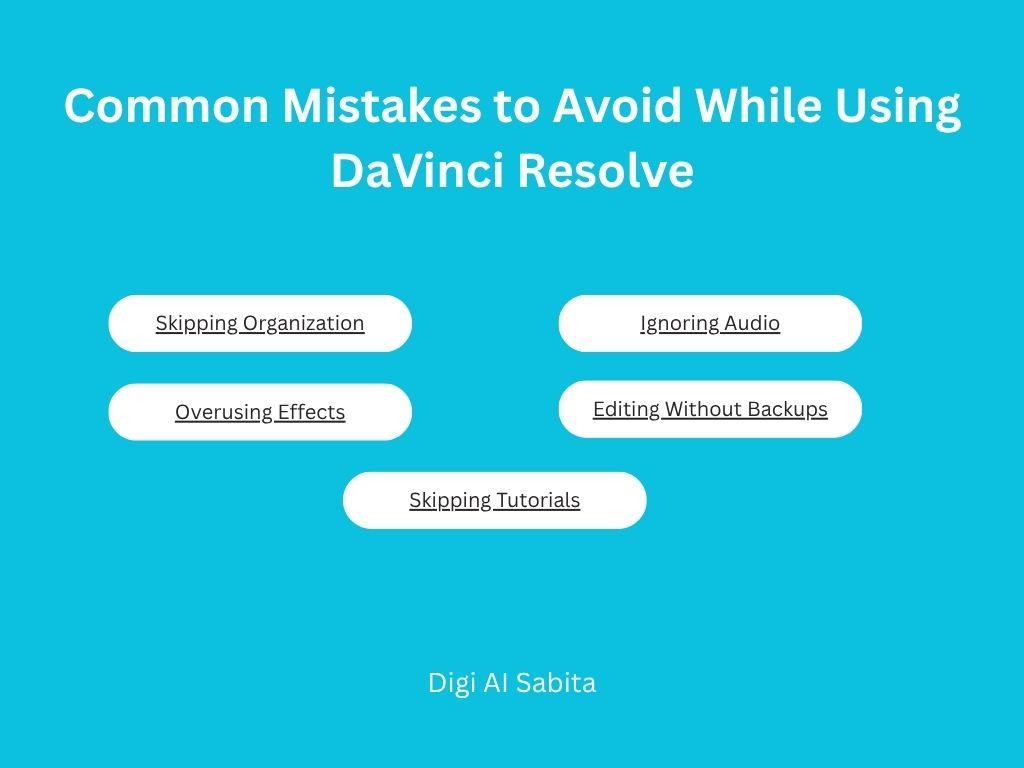
It is important to avoid some common mistakes here:
- Skipping Organization: Always label your files and organize bins.
- Overusing Effects: Use transitions and effects sparingly and with purpose.
- Ignoring Audio: Clean up audio levels and balance using Fairlight.
- Editing Without Backups: Back up your projects regularly.
- Skipping Tutorials: Spend time learning from Blackmagic’s official tutorials.
Guide to Download DaVinci Resolve
The steps to download the tools are given below:
1. First go to the official website.
Then visit the Blackmagic Design official website:
https://www.blackmagicdesign.com/products/davinciresolve
2. Click on “Download.”
On the DaVinci Resolve product page, click the “Download” button.
3.Select Your Operating System
Select your platform like
- Windows
- macOS
- Linux
4. Select Version
Select Free or Studio (Paid).
- The free version has most features and is suitable for professional work.
5. Fill Out the Form
Enter your:
- Name
- Email address
- Country
6. Click “Register and Download.”
The download will begin automatically after registration.
7. Install the Software
Open the downloaded file.
Follow the on-screen directions to install.
Minimum System Requirements
There are minimum system requirements:
- Windows 10 or newer / macOS 11 or newer
- 16 GB RAM (32 GB for intense work such as Fusion/VFX)
- Dedicated GPU (NVIDIA/AMD with current drivers)
- SSD for better performance
Tip:
Always download from the official site to prevent malware or illegal versions.
Conclusion
DaVinci Resolve is a behemoth editing software that’s entirely free and full of pro features. By learning how to use its tools, from the Cut Page to Fusion, you can create great-looking content that keeps up with industry standards.
Begin slowly, learn one feature at a time, and develop your skills incrementally. Soon, you’ll be editing like a pro using DaVinci Resolve.
FAQs
Q1: Is DaVinci Resolve free or paid?
Yes, the free version is absolutely free and has most features. DaVinci Resolve Studio (paid) adds higher-end features such as noise reduction and HDR grading.
Q2: How does the Cut page differ from the Edit page?
The Cut Page is designed for quick editing, and the Edit Page provides advanced timeline control and effects.
Q3: Is DaVinci Resolve compatible with a low-end PC?
You can, but for improved performance, employ optimized media, proxy mode, and lower timeline resolution.
Q4: Does DaVinci Resolve handle 4K and RAW formats?
Yes, it handles up to 8K editing and different RAW codecs such as BRAW, RED, and ARRIRAW.
Q5: Is it suitable for beginners?
Definitely. The learning curve is high, but it’s beginner-friendly with tutorials and an uncluttered interface.